First off, our family eats early! Casey has to be out the door by 5pm. So by 2pm I am working on dinner. I get myself to a stopping point and go pick up the kids at 2:50 and get back to the dinner thing while I help the kids do homework. It can be a little trickie so I have to plan. Tonight I got everything ready to go in the oven before I left for school and had everything in a few minutes after I got home.
I made the most amazing meatloaf. It is the Souperior Meat loaf from the back of the Lipton Recipe Secrets Beefy Onion box. Of course I have made a few "improvements" and now it is amazing. Here is the recipe:
1 envelope Lipton Recipe Secrets Beefy Onion mix.
2 lbs. lean ground hamburger
3/4 cup bread crumbs, I just use what ever bread is laying around and crumbles easy
2 eggs
3/4 cups water
1/3 cup ketchup
1/4 cup brown sugar!!!(the brown sugar was my addition)
Half an onion cut into wedges.
A little more brown sugar to sprinkle on top of the loaf
Preheat oven to 350. Combine all ingredients, except the onions. Put it all in to a bread loaf pan and arrange onions on top, so it looks pretty. Now sprinkle the last of the brown sugar on top of the loaf. Now bake the meat loaf for 1 hour or until done. Let stand 10 minutes before serving.
The brown sugar sounds off, but trust me.
Now for the veggie:
Orange Sweet Potato Casserole
3 lbs. sweet potatoes (about 6 medium potatoes), Peel and slice about 1/4 inch thick.
6 T. melted butter
2 T. honey
3 T. molasses
1 T. Grated fresh ginger or 1 t. powdered ginger
3/4 t. salt
4 t. grated orange zest
1/4 t. cayenne pepper
1-1/2 T. cornstarch
Preheat oven to 375. In a large pot boil sweet potatoes in water until parboil or until you can stick a paring knife easily into the flesh of a sweet potato. Drain potatoes well and put in a pam sprayed baking dish.
Meanwhile in a bowl whisk melted butter, honey, molasses, ginger, salt, orange zest, and cayenne in small bowl; set aside. Mix cornstarch withe 2 T. cold water in a small bowl until totally smooth, then whisk into butter mixture; pour over sweet potatoes and toss to coat well.
Cover dish tightly with foil and bake until liquid is bubbly, about 50 minutes. Remove foil, stir potatoes gently, and bake until liquid thickens to glaze potatoes, about 20 minutes longer. Cool slightly and serve hot.
You may have noticed the temperatures for the two dishes did not match and the sweet potatoes took extra long to cook. So here is how I fixed that. I cooked the potatoes a little longer than recommended and put them in with the meat loaf. As for the temperature I raise it up to 365. Some times we must make a compromise.
Monday, January 24, 2011
Sunday, January 23, 2011
BAD CHOCOLATE CAKE?!?!


Have you ever made chocolate cake because you wanted to eat the batter? I have several times. I love cake batter. Cake is....eh ok. Last week sometime decided I was going to make a cake so that I could eat some the batter. I found a recipe that looked legitimate. It is the recipe found in the BAKER'S GERMAN CHOCOLATE box. Yes I was about to make a German chocolate cake. What is the difference between a German chocolate cake and just your average chocolate cake? Nothing! Ok here is the story. A man named Sam German worked for the Baker's Chocolate Company. He had the brilliant idea of adding sugar to the chocolate so that the consumer would not have to. It was just for our convenience. They named the chocolate for him "German's Chocolate." Then about 100 years after his gift to the chocolate community a talented baker from DALLAS made the chocolate famous by creating the tempting and yummy Baker's German's chocolate cake. Her recipe is the one that is in the Baker's chocolate box. It is also the one I am going to share.
The first time I made this a week or so ago I really screwed up. The cake fell, the texture was wrong and the taste was less than moist. The frosting was pretty bad too! I attempted a very simple chocolate frosting that is not super rich. All you do is take two cups whipping cream beat it with the wire whisk in your kitchen ade until fluffy and then add a large box of pudding. Sound yummy and easy enough....well do not over mix the whipping cream. It will destroy the frosting. That was my down fall for the frosting on the first cake.
Before I get distracted again here is the recipe for the Original Baker's German's Sweet Chocolate Cake. (That is not a name it is a tittle and with cake this good it should have a tittle.)
1pkg. (4 oz.) Baker's German's Sweet Chocolate
1/2 cup water
2 cups flour
1t. baking soda
1/4 t. salt
1 cup (2 sticks) butter, softened
2 cups sugar
4 eggs, separated
1t. vanilla
1cup butter milk
Coconut-pecan filling and frosting!!!!!!!
Preheat oven to 350. Cover bottoms of 3 Nine inch round cake pans with wax paper (I only use two so I can eat a bunch of the batter!) Spray a healthy dose of Pam on your pans.
The way I make this cake differs from the recipe a bit but, trust me, it will turn out excellent this way.
Melt the chocolate in the microwave, one minute on high stir and if it needs more time only do 30 seconds increments until the chocolate is melted, be sure to stir after each trip in the microwave.
Mix flour, baking soda and salt; set aside. Beat butter and sugar in a large bowl with electric mixer on medium speed until light and fluffy. Add egg yolks , one at a time, beating until well blended after each addition. Blend in malted chocolate and vanilla. Add water and mix it all in. Next add the flour mixture alternately with the buttermilk, beating until well blended after each addition.(I did this part by hand so I could keep my mixer free for the next part.)
Beat egg whites in mixer with the wire whisk until stiff peaks form. Gently fold into batter. Pour evenly into prepared pans.
Bake for 30 minutes or until toothpick inserted int centers comes out clean. Immediately run small metal spatula around cake layers. Cool in pans 15 minutes. Remove from pans to wire racks. Discard wax paper. Cool cake layers completely. Spread Coconut-Pecan Filling and foisting between cake layers and onto the top of the cake.
Beating egg whites in baking makes things moister. The first time I made this I miss read the instruction and skipped the egg whites completely and the cake was dry and it fell. The cake was dense, more like a nasty tort.
Tips for beating egg whites: Use a metal bowl and wash it first with soap and warm water. Dry it completely. Now it will whip up a lot easier.
Now for the Coconut-Pecan Frosting
This stuff is freaking awesome. If you like carmel you will love this. If you don't like nuts and coconuts then find another frosting!
4 egg yolks
1 can (12 oz. ) evaporated milk
1-1/2 t. vanilla
1-1/2 cups sugar
3/4 cups (1-1/2 sticks) butter
1pkg. (7 oz or 2-2/3 cups) coconut flakes
1-1/2 cups chopped pecans
Beat egg yolks, milk and vanilla in a large saucepan with wire whisk until well blended. Add sugar and butter cook on medium heat 12minutes or until thickened and golden brown, STIRRING CONSTANTLY (It is so easy to burn this). Remove form heat.
Add coconut and nuts; mix well. cool to the desired spreading consistency.
That is the recipe and here is how I changed it to suit my needs. I did not have any evaporated milk so I used a 10 oz. can of sweet and condensed milk and added a 1/2 a cup to 1 full cup of milk to thin it down a bit. I then cut the sugar in half so instead of 1-1/2 cups sugar I used 3/4 cup sugar. I did everything else just the same and man is it good.
Friday, January 14, 2011
Pulled Pork Sandwiches? Yes!
If you are LDS odds are at some time or other you will be dependant on your slow cooker for your after church meal. I have been in the possession before and I have survived by finding yummy slow cooker meals. This is one of the good ones. My kids love this. It is called Tangy Pulled Pork Sandwiches and surprise surprise it comes from good old Taste of Home.
1 pork tenderloin (1 pound)
1 cup ketchup
2 1/2 T. brown sugar
2 1/2 T. cider vinegar
1 1/2 T. Worcestershire sauce
1 T. spicy brown mustard
1/4 t. Pepper
4 Kaiser Rolls, split
Place the pork tenderloin in a three quart slow cooker. Combine the ketchup, brown sugar, vinegar, Worcestershire sauce, mustard and pepper; pour over pork.
Cover and cook on low for 4-5 hours or until meat is tender. Remove meat; shred with two forks. Return to the slow cooker; heat through. Serve on rolls. Serves 4
We will be eating this tonight. I am so excited. I am going to go make some bread to go with it. You will have wait for another day to get my bread recipe.
Mac and cheese
Most people make Mac and Cheese from the box, and missionaries refer to it as yellow death. When people think of making homemade mac and cheese they often think of over complicating a simple dish. "Why would any one go to that kind of work?"
There are several different types of mac and cheese that I make. One of them is the mac and cheese my mom made for us almost every single Friday night. It is every bit as easy as making the box verity and here it is. Thank you mom for passing on the heritage of simple home cooked meals, this one is for you!
In a good sized pot boil some water. To that add 3 cups of mac. noodles and let them cook until they are tender. Then drain the noodles and return them to the pan. Next add two cans of tuna fish and one can of cream of mushroom soup. Stir that in and finally add a bunch of cheese and stir until the desired cheesiness is achieved.
I know some of you do not like Tuna then add shredded chicken or some sausage.....use your imagination.
Let us eat Flowers!
As you may well know Broccoli is a flower, it is related to cabbage and it is a cancer fighter food. All good reasons to go and enjoy some nice fresh broccoli. I personally feel that the fresher the food the better for you. I try very hard, when preparing vegetables, to steam them until they are their brightest color. Broccoli is no different. Broccoli also has calcium, an easier calcium for your body to use than the calcium you find in milk. I am not a super big fan of the flavor broccoli has to offer but I will choke it down for the nutritional value.
Our family recently enjoyed some tastie Cream of Broccoli Soup. I got the recipe from my dear friend Taste of Home.
4 cups chicken broth
2 to 2 1/2 pounds fresh broccoli spears, cut into florets
1/2 cup chopped green onions (I used dried onions because then I didn't have to saute the onions)
1 T. vegetable oil
1/4 cup flour
1 t. salt
1/4 t. nutmeg
1/8 t. pepper
1 cup half and half cream
In a large sauce pan, bring the broth to a boil; add broccoli. Reduce heat; cover and simmer until tender, about 10 minutes.
Meanwhile, in a small skillet, saute onions in oil until tender; stir into broth. I added my onions with the broccoli so they would absorb the moisture. Remove the broccoli and broth mixture from the heat; cool 10-15 minutes. Puree in small batches in a blender or food processor until smooth. Return all to the sauce pan; set aside.
In a small bowl, combine flour, salt, nutmeg, and pepper. Slowly add cream, stirring constantly. Gradually stir in broccoli mixture. Return to heat; cook over medium until heated through, stirring occasionally. Serves 4
The nutmeg adds a surprising flavor to the soup and I would not make it any other way.
Thursday, January 13, 2011
This is to Pie for

Maybe a nation that consumes as much booze and dope as we do and has our kind of divorce statistics should pipe down about "character issues." Either that or just go ahead and determine the presidency with three-legged races and pie-eating contests. It would make better TV.
-P.J. O'Rourke
My favorite dessert to make is easily pie. I can and have made pies all day long and loved every exhausting minute. I love French silk pie and Lemon meringue, those two are my all time favorite. If I am going to eat two slices of pie on the same plate than it has to be French silk and Cherry. My French silk comes from my mom and it is about like eating the best chocolate butter you have ever had. I once dained to try a Lemon meringue pie from a store and was the saddest thing I ever did. That was the foulest stuff. I have sold my pies and will sell them again. If you ever need or want a pie by all means ask me for the recipe and if you are lucky enough to live near me I would be more than happy to make it for you. I would drop everything to make a pie or two.
When you die, if you get a choice between regular heaven and pie heaven, choose pie heaven. It may be a trick, but if it's not mmmmmmmmmmmm boy
-Jack Handy
Well the pie I will be writing about is not one that I have mentioned yet, but one that, I feel, should be masted by every wife who wishes to be seen as the quint essential 1950's house wife. I like to make this pie in pearls and heels (It just turns out better that way). If you haven't guessed yet it is the illusive perfect Apple Pie.
First the crust, this recipe I got from Miss Martha. Miss Martha Stewart that is. That women knows pie:
Promises and pie-crusts are made to be broken
-Jonathan Swift
1 1/4 cups flour
4 1/2 t. sugar
1/4 t. salt
1 stick cold butter
1 large egg yolk
2 T. ice water
Ok here is how I do this, I use a food processor but I will give you hints on how to do this with out one. Put all the dry ingredients into the food processor or a mixing bowl and pulse them to mix. Next I put the shredding attachment on my food processor and shred the butter into the flour. If you are doing this by hand just use a hand held cheese grader. Then I add the egg yolk (this makes the crust extra flaky, very important if you want the perfect crust). And finally I add the ice water. I use a liquid measuring cup and put in ice and water and put that in the freezer before I do anything else that way the water is super cold and I have worked up a sweat and will be ready to drink the remaining ice water. Lastly I pulse the mixture until it forms a ball. Turn it out onto a floured surface and kneed it a few time. It is very important not to over work the dough. Place the dough in a plastic bag and put it in the fridge until you are ready to roll it out. It will work up so much better if it has been chilled at least half an hour more is better.
Now the Apple part!
Why not upset the apple cart? If you don't the apples will rot anyway
-Frank A. Clark
6 cups thinly sliced and peeled apples
1 T. lemon juice (I often use more because it keeps the apples from browning and makes the apples nice and tart if you are using something other than a cooking apple)
3/4 cup sugar
2 monsterously heaping Tablespoons flour (depending on how much lemon juice you used.)
1/2 t. cinnamon (I use a little more)
1/8 t. nutmeg (I use a little more)
Now toss all these ingredients into a nice big bowl and mix them around until all the apples are coated nicely. There should be a little (about 3/4 cup) liquid in the bottom after the apples have set in the bowl long enough for you to roll out the pie crusts and have them ready to dump your apple deliciousness into.
So now you have the pie crust rolled out and in the pie plate and you have put the prepared apples into the pie crust. Now take half a stick of butter and slice it. Lay slices of the butter onto the exposed apples. Roll out the top crust and lay that on top. Seal the edges of the pie and vent the top, it would be oh so sad to have your pie explode in the oven, especially after all the work that you just put into it. Bake that pie at 375 for 50 minutes. Some people put foil around the edges to keep them from over browning. Oh! Wait! I forgot! Brush the top of the pie with milk and, I like, to sprinkle it with sugar after that. If you can find "Sugar in the Raw" use that because it has big sugar crystals. Now your pie will look beautiful.
If at first you don't succeed PIE PIE again!
-Megan Ross
Pies don't always turn out perfect the first time. I made this pie loads of time and now when I am baking at home, with my own oven, than I can get this pie to turn out perfect. I hope you make it and make the man in your life happy.
Ham dinner


Saturday January 8th I made a lovely ham dinner. I love the bone in ham the best. I find it has the best flavor and it is pre sliced. I prepared it in a bag. One of those turkey bags and it turned out so much moister than any other ham I have ever made. I think this was the best and tastiest ham. I was also very careful not to over cook it.
With the ham I served mashed potatoes. I left the skins on. It made for a much more rustic looking mashed potato. They were tastie. I did not use butter instead I used cream cheese and of course salt and milk. I counted out about 6 smallish red potatoes one for each person in our family and then did the full 8 ounces of cream cheese and I have no clue how much salt or milk I put in. I whipped them in my faithful kitchen aid.
I made gravy...........OH GRAVY.........The bani of my very existence. I hope to one day say I can make good gravy constantly.
moving on
We also had a veggie. Corn, I believe. We just opened the can, heated and served.
Now time for dessert! We had a very rustic Carrot Cake. I had never before attempted a Carrot Cake with out a cake mix. It was tastie however I doubt very much that I will ever make this again. When I think of cake I think of moist tender cake. This had a rough rugged texture but the taste was pretty good. I got the recipe from......you guessed it Taste of Home.
1 1/3 cups canola oil
4 eggs
1 1/2 cups sugar
2 cups flour
2 t. baking soda
2 t. baking powder
2 t. cinnamon
2 1/2 cups finely shredded carrots
1/2 cup chopped walnuts (I used almonds)
Cream Cheese Icing (I couldn't imagine frosting a Carrot Cake with any thing but Cream Cheese)
1 pkg. (3 ounces) cream cheese
3 cups powdered sugar
dash salt
1 t. vanilla
2 T. milk
In a large bowl, combine the oil, eggs and sugar. Combine the flour, baking powder, soda, and cinnamon; add to wet ingredients and beat well. Stir in carrots and nuts. Pour in to a greased 9x13 pan and bake at 350 for about 50 minutes.
For frosting, beat cream cheese and sugar in a medium bowl. Gradually add vanilla and milk, until desired consistency.
Vanilla, beautiful, lovely, fair, vanilla. To truly enjoy vanilla do not use fake. Real VANILLA. Every thing tastes better when the food you cook with is real.
On a side note I use to put vanilla and water in a spray bottle and use it to chase away monsters. Penny and Minnie were sure that monsters would sneak into there room but every one knows that monsters don't like chocolate chip cookies and that is what vanilla reminded my girls of so I would take my vanilla spray into there room when they complained of monsters and spray the monsters away. Highly successful. Thank you Vanilla!
Thursday, January 6, 2011
Chocolate chip cookies to sing about! LALALALALA
I have played with Nestly Toll House chocolate chip cookie recipe. One complaint I have heard from may a fine cook it that their cookies always turn out flat and to crispy. Many have said they use the recipe on the back of the chocolate chip bag and just can't get it to work out. After some trial and error I have finally got this recipe perfected.
2 1/4 cups flour
1 t baking soda
1 t salt
3/4 cup Butter (remember to use the real thing)
3/4 cup sugar
3/4 cup packed brown sugar
1 t vanilla
2 large eggs
2 cups chocolate chips
1 cup chopped nuts
The first thing I do is put the butter fresh for the fridge (because I never plan ahead) in my Kitchen Aid and beat it until it is lighter in color fluffier looking.
In a mixing bowl I mix flour, baking soda, and salt. Then I set it aside.
Next add both sugars to the butter. Remember sugar is a liquid when baked. When you pack the brown sugar in the measuring cup do not pack it to tight. After the sugar is mixed in add the vanilla and eggs. Once that has been mixed until smooth add the flour mixture and let it mix until smooth. Then add the chocolate chips. Now check the consistency of the dough. It should be sticky but it should still be able to form a ball. Bake at 375 for 9-11 minutes!
Kitchen Aid- If you really love cooking and baking give your self a wonderful gift and buy a Kitchen aid! If you already have one, Happy Day and Happy baking!!!
Missionaries and Taco Ramkins

Last night we had the Missionaries over for dinner. It was kind of last minute notice and lucky for them we were planning on having Taco Ramekins. I love this dish because it is so fun to serve. This recipe comes from TASTE OF HOME! I use a lot of their recipes because 90% of them turn out wonderful and quickly become family favorites. This recipe comes from the cooking for 2 section, so it will need to be doubled or played with until you have enough for your family. Here it is:
1/4 pound ground beef
1/4 t. chili powder
1/8 t. salt
1/8 t. pepper
3/4 cup biscuit/baking mix
3 T cold water or milk
1 medium tomato, sliced
1/4 cup chopped green pepper
2 T sour cream
2 T miracle whip or mayo (which ever you prefer)
2 T shredded cheddar cheese
1 T chopped onion (I use dried onions)
In a skillet, cook beef over medium heat until no longer pink; drain. Stir in the chili powder, salt and pepper. Remove from the heat and set aside.
Combine biscuit mix and water to form a soft dough. Press onto the bottom and up the sides of two 10oz ramekins or custard cups coated with cooking spray. Fill with meat mixture; top with tomato and green pepper. Combine the sour cream, miracle whip, cheese and onion; spread evenly over top.
Bake, uncovered, at 375 for 20-25 minutes or until heated through.
Perrin was very entertaining to our Missionary guests. He is the king of wonderfully awkward moments. He tried to convince the Elders that he can speak Greek and that he is an authority on the subject of Greece. He knows how to say a few phrases he learned from a book so I am fairly sure he does not know how to say them properly. It was nice to sit back and let Perrin be Perrin and know that those two young men would be kind and tolerant to my little boy. I am sure he had a blast and the Missionaries had lots to talk about after they left.
Flour, wonderful, puffy, flour!
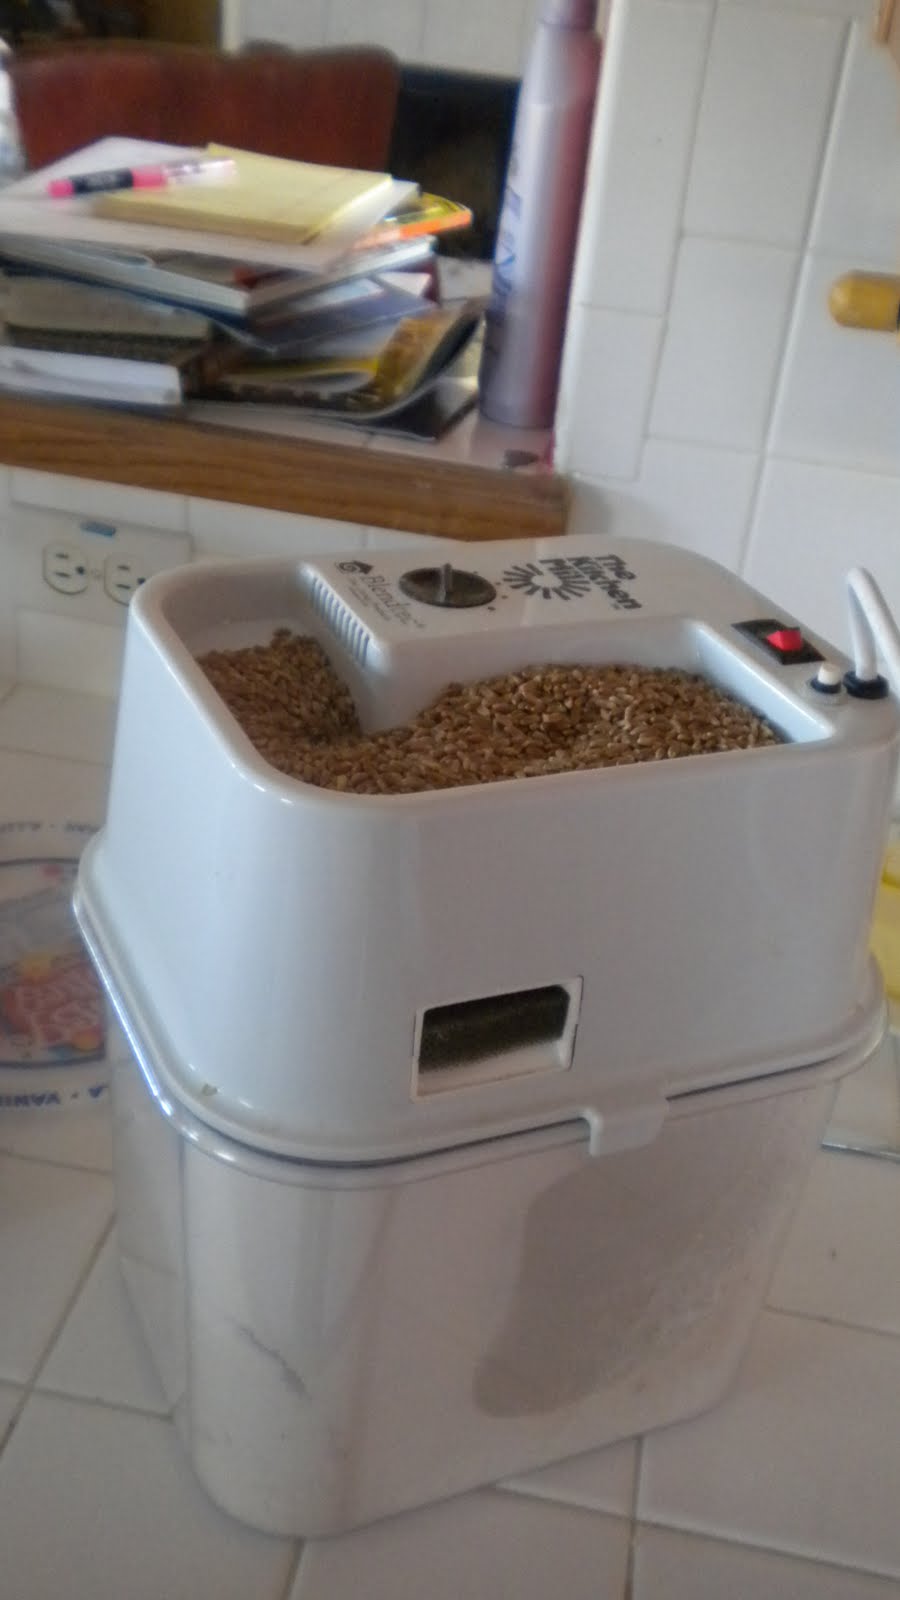
I have a wonderful wheat grinder. I would normally not tell you what brand I have but, I feel that if someone comes across a kitchen appliance that is out standing, the information should be pass on. So I have "The Kitchen Mill" by blend tec. The reason it is so amazing is because my mom has the some one only she has had hers for about 20 years.....really TWENTY YEARS! And she made homemade bread the whole time I was growing up. She used her wheat grinder a lot.
Yesterday I got out my wheat grinder and fired it up, not because I wanted to make something, just because I wanted to make sure I have some flour on hand. Nothing is more annoying than deciding to make something and then realizing I need to grind some wheat, especially if I am working with a limited amount of time.
I store my wheat in a large gray toat in my garage. I am not sure if that is the best place to store it, but it was convenant when my parents showed up last Christmas with a couple hundred pounds of wheat as a gift. (I love my Mom and Dad) I buy ice cream by the gallon so I can have the plastic tubs it comes in. After some experimenting Blue Bonny is the best tub, however I have several different brands, which led to the troubles I had yesterday. I use those tubs to store the flour in. I had one tub nearly full of freshly ground flour. I put the lid on and tapped it on the floor to help it settle so I could finish filling it with flour. When I tapped it the entire bottom broke and made a rather funny mess. I am thinking of switching to five gallon buckets from Lowes. I was able to save most of the flour and get it into another better container. And now I have lots of wonderful flour so I can do some baking when ever the mood hits me, which it will and often.
Tuesday, January 4, 2011
Chicken Stuffing Casserole
I found a recipe book at Lowes while Casey was busy looking at something perfectly boring. It entertained me and it is by Taste of Home so I decided to buy it. It is called "Dinner on a Dime" and it is one of my favorite recipe books. It has a section called "Freezer Pleasers" and I have made just about every meal in this section. You make twice as much and put one in a disposable freezer safe container and then some other night when you just do not have time to cook...POOF! Homemade dinner. It is happiness in the freezer.
2 packages (6 ounces each) chicken stuffing mix
2 cans (10-3/4 ounce each) condensed cream of mushroom soup, undiluted
1 cup milk
4 cups cubed cooked chicken
2 cups frozen corn
2 cans (8 ounces each) mushrooms stems and pieces, drained
4 cups (16 ounces) shredded cheddar cheese
Prepare stuffing mixes according to package directions. Meanwhile, in a large bowl, combine soup, milk, chicken, corn, and mushrooms; set aside. Spread the stuffing into two greased 9x13baking dishes. Layer with soup mixture and sprinkle with cheese.
Cover and freeze one casserole for up to three months. Bake the second casserole for 30-35 minutes
to use frozen casserole: Remove from the freezer 3o minutes before baking (do not thaw). Bake at 350 for 1-1/2 hours. Uncover; bake 10-15 minutes longer until heated through.
Yield: 2 casserole (6 servings each)
Here are a few things that helped me: Cooking the chicken
There are a couple of ways to do it, boil or broil. Boiling is fast and no fuss. You can do it while the chicken is frozen, and then you could cut it up into chunks or shred it. Broiling makes the chicken more flavorful. I thaw it out in a sink full of warm water. Then I rub it with salt an pepper or any other spice you would like. Next I put it under the broiler on the low setting for 10 minutes on each side. Finally I just cut it up and toss it into dinner.
Using the frozen casserole
Brownies! Oh chocolatie goodness.
I just ate a scrumptious moist rich brownie. It was everything a brownie should be. I have a favorite brownie recipe that, without fail, makes the best brownies ever. It is the same recipe that is in the Bakers Unsweetened Chocolate box. And here it is for all of you copy and pasters.
4oz unsweetened chocolate
3/4 cup butter
2 cups sugar
3 eggs
1 teaspoon
1 cup flour
1 cup nuts (optional)
Preheat oven to 350 and spray pam on a 9x13 pan.
Melt chocolate and butter in microwave in a large bowl. Stir in sugar, eggs, vanilla, and flour. Mix well. Spread in prepared pan and bake for 30-35 minutes.
This recipe says it makes 24, but if you are like me it will make 12 or so.
You can put chocolate chips on it when it first comes out of the oven and after they melt spread them around.
I have made a chocolate frosting and spread that on top but found it to sweet and rich.
Once I made Cream Cheese brownies by: Preparing as above using 4 eggs instead of 3. Spreading in prepared pan. Beat 1 (8oz package) softened cream cheese, 1/3 cup sugar, 1 egg, and 2 tablespoons flour until well blended. Drop by spoonfuls evenly over brownie batter. Swirl with knife several times to marbleize. Bake 40 minutes. This was yummy but it took more than one bowl and more time. If you need a baked chocolate goodie and you need it now! skip the cream cheese.
Butter!!!!!! If you are making a dessert or something just for enjoyment, use butter. It is much better tasting than any of the fake fat. This is real fat and it is sooooo much better than any thing else. Don't cheat on your dessert, they are meant to be enjoyed and cannot truly be enjoyed unless you allow yourself to have the best and butter is the best tasting fat ever!
Why write about food?
Why write about food you ask? The first reason is because I love it, truly and deeply. I love that I can mix flavors and send my mouth on a trip to yummy town, sometimes a different trip with the same food. Many times, in my kitchen, we do not end up in yummy town but in a foreign and unfamiliar place. Second, food is art. I love to go into my kitchen with an idea of what I want to create and come out with some unexpected form of that idea. Honestly I struggle with making my food look really beautiful and that is why I want to start documenting and sharing. Maybe by my knowing that if I work really hard on something I can photograph it and share it, then I will put the extra effort into the beautification process. Third, I love that in my kitchen there are constance, yeast will rise, sugar will sweeten, and eggs will always stir my curiosity. In a world where nothing is certain, nothing happens the same way twice and nothing is sure, my kitchen is a haven from that chaos. Fourth, I love that in my kitchen my children can always come and talk, share, and experiment with me. It is a place where I am always at peace and always endlessly patient. In my kitchen I teach not only cooking but life skills and love skills, to my tender little ones. And finally I love that food is comforting. Food calms my troubled soul.
This year I have set a rather lofty goal. I will not eat out except the day before Thanksgiving. I know that for some of you this is not really a big deal. However I am sure there are others who are thinking, "Good luck. Better you than me!" My family eats out at least once a month and I take Rue out to eat after our grocery shopping every Friday. This will be a stretch for me. I want to do it for a two reasons, 1: save me money! and 2: I need to know I can do it. You will be along for the ride. I know that some nights we will have beautiful elaborate meals and while other nights we will suffer with cold cereal. Either way you look at it we will have an adventure.
I hope that you are wondering why I chose the day before Thanksgiving to eat out. I do indeed have a very good reason to eat out that day. It is tradition in my family. I spend all day making pies and rolls for Thanksgiving and as a reward I eat out. When I spend all day in the kitchen on my feet preparing for a feast like Thanksgiving I want to spend that evening relaxed, and so we will eat out.
And with this brief note I hope my writing inspires you to go create something in your own kitchen.
Subscribe to:
Comments (Atom)